
In my three years of writing for The Female Gaze, whether it be reviewing museum exhibitions, reflecting on different movements in art history, or conducting interviews with artists, I realize that I have never discussed my own art. It’s been a complicated relationship – I’ve struggled with mediums like drawing and sculpture, and while I have engaged in these art forms in order to inform my knowledge of art history, and as part of required courses at Wellesley, I find it difficult to reconcile the world and all its complicated elements onto a single canvas. I don’t have a lot of natural talent when it comes to fine art; I’ve always struggled with it and prefer to analyze and reflect on other artists’ works and movements.
With all that said, the one art form that I’ve enjoyed and felt confident in is photography. I first took a photography class at my middle school in suburban New Jersey in the summer before 8th grade. It was there that I learned to use a black-and-white film camera, to choose meaningful compositions to capture, and to successfully develop and print film. The class sparked my love of the medium. Since I learn best through following steps, I liked the step-by-step nature that came along with shooting, developing, and printing the film. I also love its honesty and ability to tell a story. Photography has often been used in a realist nature, capturing scenes almost exactly as they are experienced first-hand. Photographs are often titled with the subject matter, date, and location, so there is usually a biographical nature to them because you can pinpoint exactly where something took place, and what life was like at that point in history.
With this in mind, I want to share my own photography with you, and take you through the journey of a photograph’s development. Below, I’ve included a black-and-white photograph of daisies that I took on my middle school campus in the summer of 2006. I captured this photo primarily because I liked the subject matter. I find flowers beautiful to photograph because there are many different shapes and textures evoked, whether they be the crinkled petals, the wispy stalks of grass, or the leathery leaves. These textural components are pleasing to the eye and make for a versatile composition. I also feel that this photo comments on the cycle of life, a universal theme that audiences as a whole can relate to, as it displays a variety of flowers that are emerging, alive, or dying. Lastly, subjects such as these offer an opportunity to experiment with focus. As there are multiple flowers depicted, the photographer can choose which portions to focus on, and which to blur. These decisions make for a pleasing composition due to the variety of representations of the same subject.
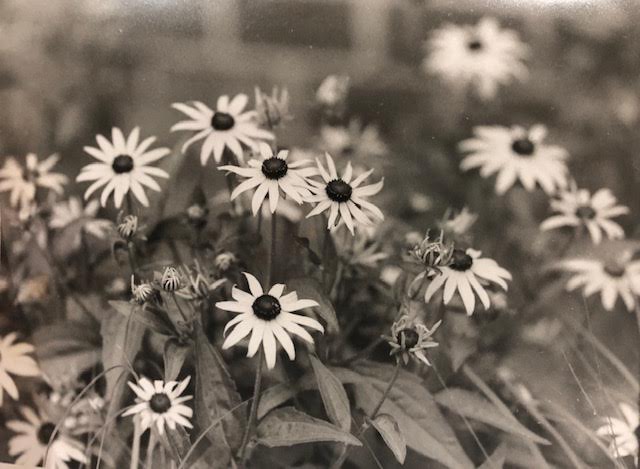
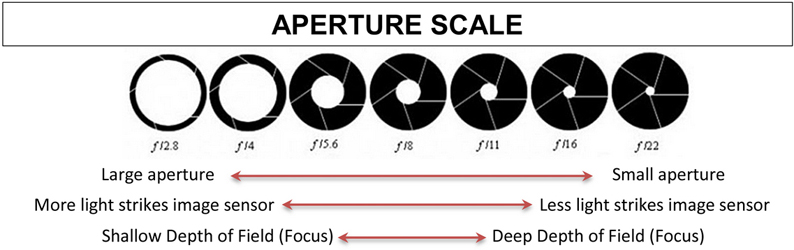
When photographing subjects such as this one, there are a few key terms and techniques to understand, which I’ve boldfaced for clarity. The first is the concept of aperture (see below diagram). The aperture is the hole of the camera lens, which can be widened or shrunk. The f-stop, as illustrated below, refers to the size of the aperture: f/2.8 represents a large aperture, while f/22 would be a small opening. You vary the aperture based on the depth of field you want to achieve, or what type of subject you would like to depict and to what extent the scene should be in focus. For example, a large aperture allows for a shallow depth of field. This means that very little of the scene is in focus, which is ideal for representing wide, comprehensive scenes like landscapes. A large aperture also permits more light to come through, since bigger scenes will need more illumination in order to properly depict all of their components.
Conversely, a small aperture allows for a deep depth of field. This means that mostly all of the image will be in focus, and less light will be needed for this fixated scene. A smaller aperture is typically used for singular subjects like portraits, or any scene that requires more of a close-up shot. I used a smaller aperture and f-stop when I captured the photograph of the daisies, because it was a smaller, focused scene and required much of the image to be shown in detail.
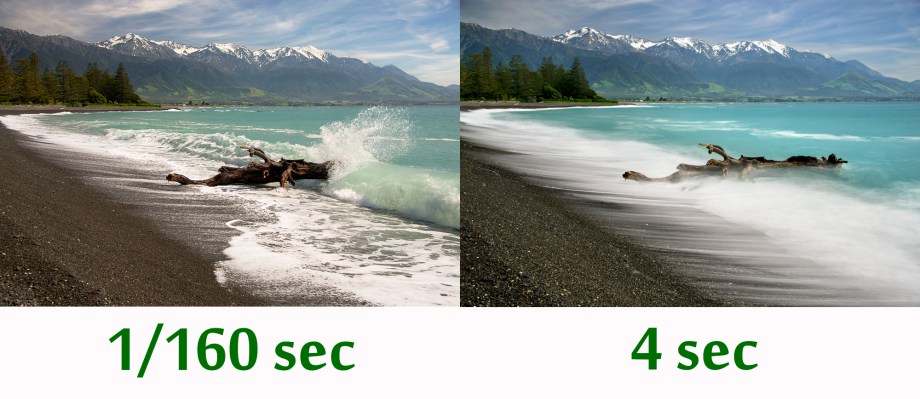
Another basic concept to understand is that of shutter speed, which is the number of seconds that the lens opens to take the photo. Shutter speed can range from small fractions (faster speeds) to large whole numbers (slower speeds). For example, shutter speeds in the fractions let a small amount of light in and take the picture quickly, which is ideal for bright days and subjects that do not need a lot of exposure time. On the other hand, shutter speeds in the whole numbers let more light in and take the picture over a longer period of time, which may be used for night photography or to create a blurry or time-lapsed effect in photos (see below comparison). Since I took the photograph of daisies on a sunny summer day and did not intend to create many blurs or depict the subject over an extended period, I used a shorter shutter speed.
Once you have taken your picture, you must develop the film reel. You do this by placing it inside a tank (pictured below) and pouring the following chemicals into the tank in succession, agitating or shaking it during each phase:
-
- Pre-wash: Water solution that cleans the film and readies it for the developer.
- Developer: Chemical that makes the image visible on the reel.
- Stop Bath: Fluid that prevents the film from developing any further.
- Fixer: Chemical that makes the reel insensitive to light.
- Wash: Water that serves to get rid of any leftover fixer.
- Wetting Agent: Liquid that clears the reel of any additional water spots so that it dries cleanly.
(Steps adapted from A Photo Teacher).
The developing process needs to occur in complete darkness, as the film negatives are extremely light-sensitive and will be destroyed if they are exposed to light too early. Gloves and in some cases, goggles, are essential to avoid the chemicals coming in contact with the skin.

Once the film has been developed, the next step is to print it, which happens in a darkroom, an area with low-level, often red-colored safelights. These emit light at low wavelengths, which allow photographers to see what they are doing without destroying the photographs. At this stage, it is permissible to have dim lighting, while the process of film development cannot have any.
The first step in the printing a photo is to place the negative that you want developed into an enlarger, which is essentially a projector that helps translate the film negative onto photo paper (see below diagram). You adjust the elevation and focus knobs depending on the size of the paper and the extent that you want the image to be in focus. Then, you place the paper onto the baseboard of the enlarger, and project the negative onto the paper.

After the image is projected, it makes its way through four liquids, similar to the steps taken in the initial developing process: the developer, the stop bath, the fixer, and the wash. It is essential to agitate each fluid to ensure the paper gets fully immersed, and to use tongs to avoid skin irritation when transferring the paper. After it goes through the wash, the photo has completed its journey and can be hung to dry.
Photography is a medium that I have greatly enjoyed because of its step-by-step nature and the thrilling journey that it takes you through, from deciding on a subject, to manipulating the camera elements to appropriately capture the image, to developing the film, to printing it on the photo paper, a canvas that can be memorialized for posterity. Photography is an art medium that gives me great joy, and I hope to keep capturing, developing, and sharing my photographs for years to come.
